
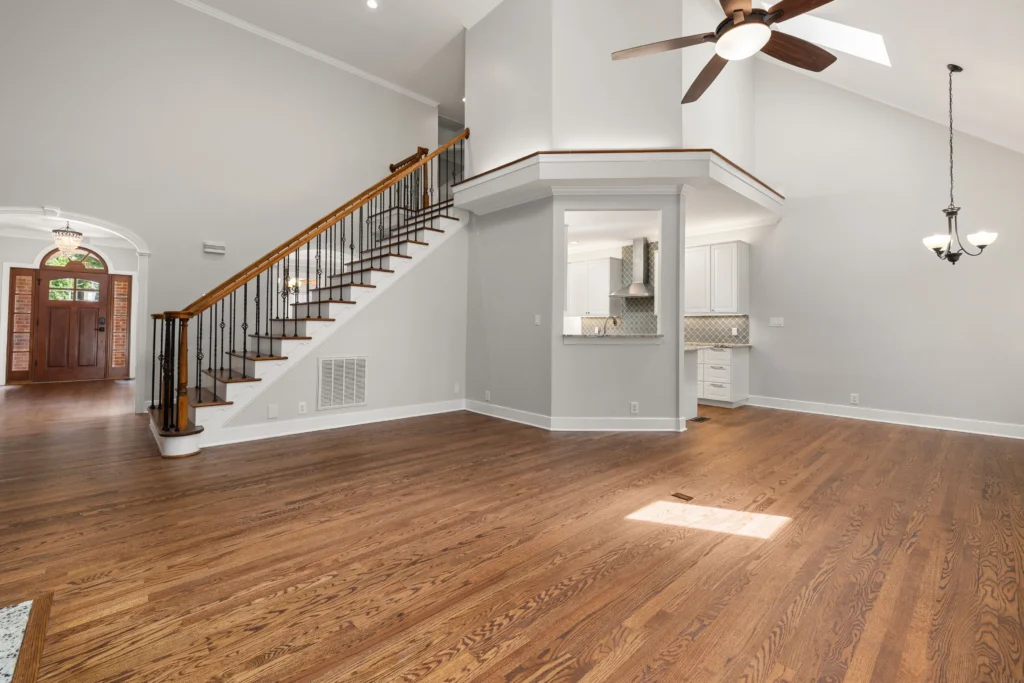
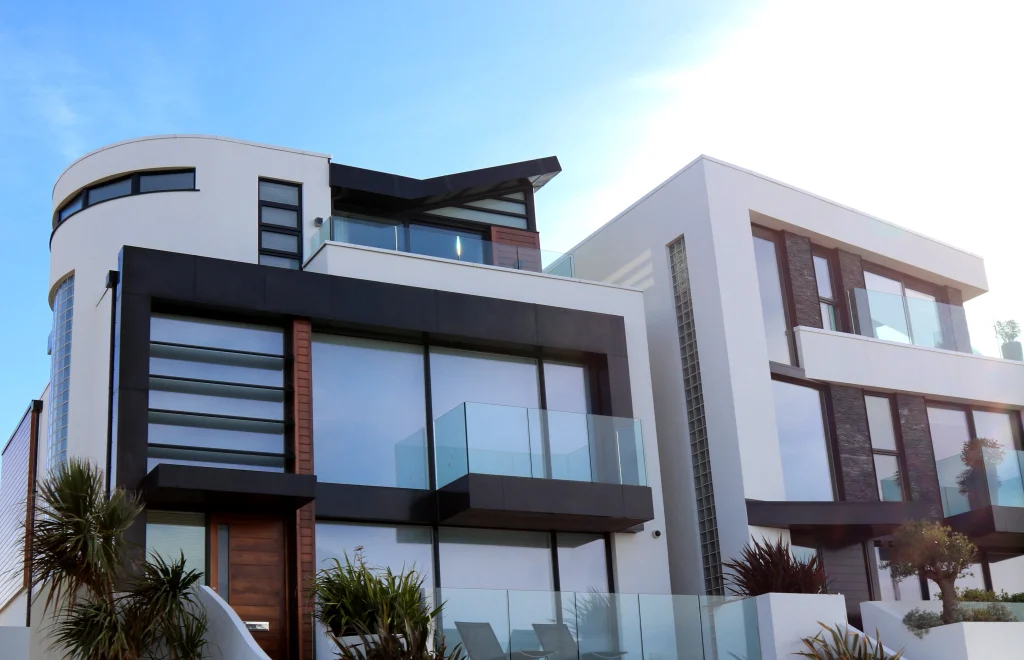
Quick answer: Real estate photography is the craft of photographing homes and properties so they look bright, clean, and inviting in listings. The keys are soft light, straight lines, a tidy space, a natural wide lens, and light editing. Master these five habits, and your listing photos will look professional.
Most buyers see a home online long before they walk through the door. A dark, crooked photo can lose a showing. A bright, clear one can win it. That is why real estate photography matters so much to agents, owners, and photographers.
This guide covers real estate photography for beginners from start to finish. You will learn about gear, camera settings, light, composition, room-by-room tips, editing, and how to find your first clients. Each tip works with a camera or a phone.
What Is Real Estate Photography?
Real estate photography is the practice of capturing homes, apartments, and commercial spaces to help sell or rent them. The goal is simple: show the property as it truly is, only at its best.
It differs from art photography. You are not chasing mood or drama. You are giving buyers clear, accurate, attractive information. Good real estate photography is bright, level, and honest.
Most shoots include:
- Exterior views of the front, back, and yard
- Interior shots of every main room
- Detail shots, such as a fireplace or a kitchen island
- Aerial drone views
- Twilight shots
- Floor plans and virtual tours
Why Real Estate Photography Matters
Listings with strong photos get more views, more saves, and more calls. Buyers scroll fast, and the first image decides whether they click.
Professional real estate photography can help a home sell faster and sometimes for a better price. It also makes the agent look good. For photographers, the field is steady, because agents need new images for every listing.
Real Estate Photography for Beginners: Where to Start
You do not need a big budget. Start small, learn the basics, and build skill one shoot at a time. Here is a simple path for real estate photography for beginners:
- Learn your camera’s basic controls.
- Practice in your own home and in friends’ homes.
- Study listings you admire.
- Build a small portfolio of 10 to 15 images.
- Pitch local agents and offer a trial shoot.
Gear for Real Estate Photography
1. A Camera With Manual Control
Any camera with manual mode works for real estate photography. A full-frame body handles dark rooms and bright windows better, but a basic entry-level camera is enough to begin.
2. A Wide-Angle Lens
A lens between 16mm and 24mm on a full-frame camera suits most rooms. Do not go too wide. Extreme lenses stretch the edges and make rooms look bigger than they are. Buyers notice, and trust drops. Among all real estate photography tips, lens choice may protect your reputation most.
3. A Tripod
A tripod is the most useful accessory in real estate photography. It keeps the camera level, allows low ISO, and makes bracketing easy.
4. Extras That Help
- A remote release or timer
- A hot-shoe level
- A flash or speedlight with a bounce card (optional)
- A microfiber cloth
- A small step stool
- Spare batteries and cards
Camera Settings for Real Estate Photography
Start with these settings for real estate photography for beginners:
- Mode: Aperture priority or manual
- Aperture: f/8 to f/11 for sharp detail from front to back
- ISO: 100 to 200
- Shutter speed: Let the exposure decide, since you are on a tripod
- White balance: Set it manually, or fix it in RAW
- File format: RAW
- Bracketing: Three to five frames when windows are bright
These settings keep real estate photography sharp, clean, and easy to edit. Avoid f/22, which softens detail.
Understanding Perspective and Focal Length
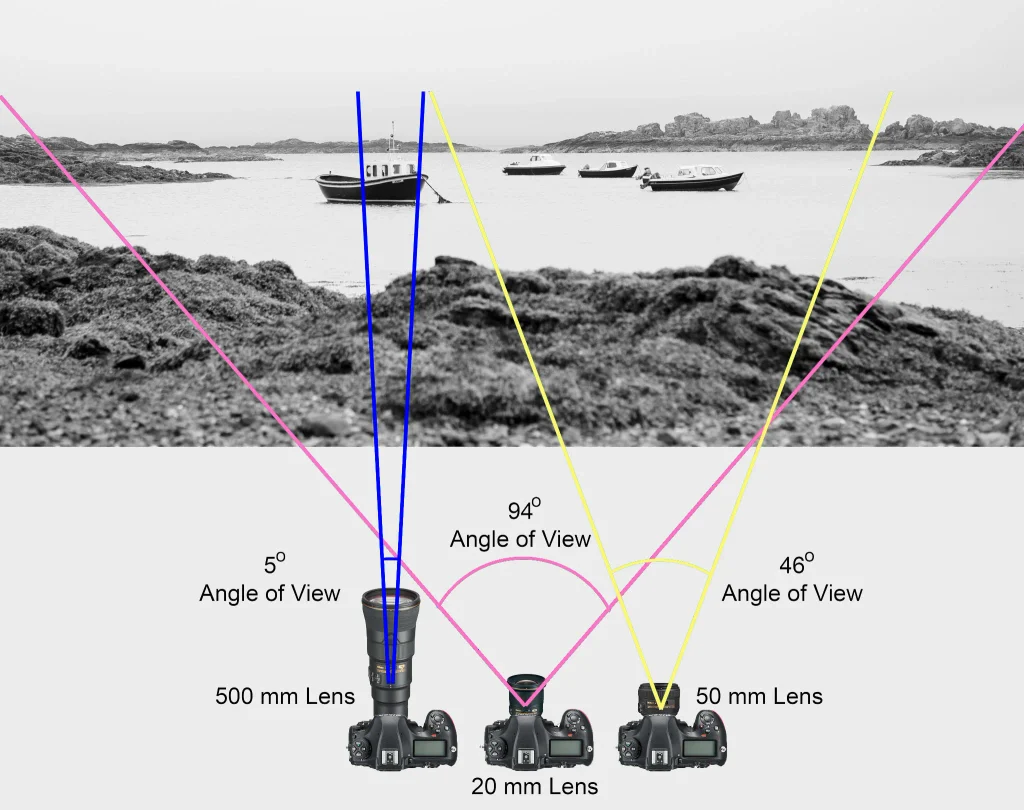
Perspective is how a lens shows depth and size. A wide lens pulls the viewer into the room and makes it feel larger. A longer lens flattens the scene and makes spaces look tighter. Buyers want a fair view, so pick a focal length that feels like what a person sees when they walk in.
Stay at the wide end of 16mm to 24mm for most rooms. Use 35mm to 50mm for details such as a stove, a staircase, or a built-in shelf. Move your feet to change the view instead of using digital zoom. If a room is tiny, shoot from a corner and accept that you cannot show everything in one frame. Take two shots instead. Honest framing builds trust with agents and buyers, and trust brings repeat work.
Keep the camera at the same height across a set so the photos feel consistent. Check that the top of the doorframe sits near the top of the screen and that the floor does not dominate.
Light in Real Estate Photography
Light shapes every room. Soft daylight makes spaces feel open and warm. Harsh sun or dim bulbs make them feel flat or cold.
The best real estate photography uses mostly natural light. Open the curtains. Turn off lamps if they clash with the daylight. Shoot when the sun is not shining straight through the main windows. Overcast days and bright shade work well.
If you use flash, bounce it off a white ceiling or wall. Never aim it straight at the room, since that creates glare and hard shadows.
Handle Mixed Light
Daylight is cool. Bulbs are warm. Pick one main light source and switch off the rest. If bulbs do not match, swap them before the shoot.
Balance Bright Windows
Cameras struggle with bright windows and dim rooms. Bracket your exposures and blend them later. On a phone, use HDR mode and tap the darker area to lift the exposure.
How to Bracket and Blend Exposures
Bracketing means taking several photos of the same scene at different exposures. One is dark enough to keep the window view. One is bright enough to show the room. One sits in the middle. You blend them later to get a natural result.
Set your camera to auto-bracket with three to five frames, two stops apart. Use a tripod and a timer so the frames line up. Do not move furniture or people between frames. Close doors and turn off ceiling fans.
In editing, merge the frames into one HDR image, or blend them by hand with masks. Masking gives a more natural look. Aim for windows that show a hint of the view, not a blown-out white rectangle. If the result looks glowing or gray, pull back.
Flash is another option. A bounced flash lifts shadows in the room while the ambient exposure holds the window. It takes practice, so beginners often start with bracketing.
Composition Tips for Real Estate Photography
Strong real estate photography has straight lines, balanced frames, and a clear view of the space.
- Keep the camera level. Leaning walls look sloppy. Use the grid.
- Shoot at chest height. Around 1.2 to 1.5 metres suits most rooms.
- Shoot from corners. A corner view shows depth and layout.
- Show flow. Include doorways and openings that connect rooms.
- Check the edges. Look for cut-off furniture, cords, and clutter.
- Take wide, medium, and detail frames. A mix tells the whole story.
Room-by-Room Real Estate Photography Tips
Each room needs its own approach in real estate photography. Use these quick guides.
Living Room
Show the seating area as a whole. Keep the sofa from filling the foreground. Plump the cushions and straighten the rugs.
Kitchen
Clear the counters, hide the dish rack, and wipe the sink. Shiny taps and appliances show reflections, so check them twice. Turn on under-cabinet lights only if their color matches the room.
Bedroom
Make the bed with no wrinkles. Keep bedside lamps at the same height. Avoid shooting straight at a mirror.
Bathroom
Close the toilet lid, hide bins and toiletries, and put out fresh white towels. Wipe chrome and glass. Stand in the doorway and make sure you do not appear in the mirror.
Dining Room
Show the table and the space around it. Remove clutter and add a simple centerpiece.
Home Office and Small Rooms
Shoot from a corner and avoid extreme wide angles. Small rooms look better when you show them honestly.
Garage, Basement, and Utility Spaces
Tidy the area and keep the shot simple. Show the size and the condition.
How to Stage a Home for Real Estate Photography
Staging is about preparing the home so it looks its best on camera. You do not need new furniture. A few simple steps go far:
- Remove personal photos, magnets, and small clutter
- Clear the counters and surfaces
- Hide cords, remotes, and cleaning items
- Open curtains and blinds
- Turn on all lights, then check the color
- Add a plant, a bowl of fruit, or fresh flowers
- Check the lawn, doormat, and entrance
Ask the seller or agent to do this before you arrive. A neat home saves hours of editing.
Exterior Real Estate Photography
Curb appeal sells. For exterior real estate photography, plan your timing and angle.
Shoot the front when the sun lights the facade, not when it hides behind the house. Mow the lawn, move cars, and put bins away. Stand at the corner of the property to show two sides. Keep the camera level so walls stay straight. Include the yard, patio, and pool if there are any.
Twilight Real Estate Photography
Twilight shots use the soft blue sky and warm lights to make a home feel cozy. They are popular for premium listings. Arrive just after sunset, set the camera on a tripod, and turn on all the lights. Shoot for about 20 minutes as the sky changes. Bracket exposures for the best balance.
Drone Real Estate Photography
Drones show the roof, the lot, and the neighborhood. They work well for large properties. Know your local rules, get any licenses needed, and avoid restricted areas. Keep the camera level and fly during soft light.
A Simple Shooting Workflow
A set routine makes each shoot faster and less stressful. Try this order:
- Arrive 15 minutes early and walk the home with the agent.
- Open curtains and turn on lights.
- Do a quick tidy and fix anything that looks off.
- Shoot the exterior first, while the light is best.
- Move inside and shoot the main living areas.
- Work through the kitchen, bedrooms, and bathrooms.
- Capture detail shots and special features.
- Return outside for the back yard or twilight shots.
- Check your screen, then back up your cards.
- Switch off lights, close doors, and lock up.
Most home shoots take 60 to 90 minutes. Bigger homes take longer.
Property Types: What Changes
Different properties need different thinking.
Condos and apartments: Rooms are small. Shoot from corners, show the view from the windows, and include shared spaces such as the lobby, gym, or rooftop. Ask about building rules first.
Luxury homes: Detail matters more. Take more time with light and composition. Add twilight and drone shots. Show finishes like stone, wood, and fixtures.
Vacation rentals: Show the lifestyle. Include outdoor seating, views, beds, and amenities. Warm, welcoming styling matters.
Commercial spaces: Show layout, light, and access. Wide shots of open floors, entrances, and parking help business buyers. Keep the frame clean and professional.
Vacant homes: Empty rooms can look cold and small. Shoot in good light and consider virtual staging if the agent offers it. Label staged images clearly where rules require it.
Fixer-uppers: Be honest about condition, but shoot the best angles. Focus on space, light, and potential.
Editing Real Estate Photography
Editing is a big part of the job. Follow a simple order:
- Cull and select the best frames.
- Apply lens corrections.
- Straighten verticals and horizons.
- Blend bracketed frames, or lift shadows and lower highlights.
- Set clean white balance.
- Remove small flaws, like marks or cords.
- Sharpen lightly and export.
Keep your edits honest. Heavy HDR, over-saturated colors, and fake skies can mislead buyers. Real estate photography should show the home as it is.
To speed things up, create presets, but adjust each image.
Real Estate Photography Mistakes to Avoid
- Tilted lines: Keep the camera level.
- Too wide a lens: Rooms look fake.
- Dark rooms: Use bracketing or a flash bounce.
- Mixed colors: Match the light.
- Clutter: Clear it first.
- Heavy editing: Keep it honest.
- Too few photos: Cover every main space.
Most errors in real estate photography come from rushing. Slow down and check each frame on the screen.
Troubleshooting Common Problems
Photos look yellow: Mixed bulbs or warm lights are the cause. Match bulb colors, or switch lights off and use daylight.
Windows are white: Bracket exposures, or lower the exposure and blend.
Rooms look crooked: Level the camera and fix perspective in editing.
Images look soft: Use a tripod, check focus, and avoid very small apertures.
Reflections in mirrors or glass: Change the angle or shoot from the side.
Rooms look dark: Open curtains, add light, or use a bounced flash.
Colors look off on different screens: Calibrate your monitor and export in sRGB for web use.
Photos look fake: Reduce saturation, contrast, and sharpening.
Real Estate Photography Checklist
- Plan: Confirm time, access, and shot list
- Gear: Tripod, wide lens, charged batteries
- Settings: f/8, ISO 100, RAW, bracketing
- Light: Natural, lights matched, curtains open
- Room: Tidy, staged, no clutter or reflections
- Frame: Level, chest height, clean edges
- Coverage: Every room, plus exterior and details
- Edit: Natural colors, straight lines, no heavy effects
Real Estate Photography With a Smartphone
Phones can do well for starters. You can begin real estate photography for beginners with the phone you already own. Follow these steps:
- Wipe the lens.
- Turn on the grid.
- Tap to lock focus and exposure.
- Use HDR for bright windows.
- Avoid digital zoom.
- Use a small tripod or a stable surface.
- Edit lightly in a free app.
Video and Virtual Tours
Many agents now want more than still photos. Short video clips, walkthrough tours, and 3D tours help buyers explore from home. To offer these, start with a simple walkthrough on a gimbal or phone stabilizer. Move slowly, keep the camera level, and use natural light.
3D tour cameras capture a full scan of a home. They cost more but add a premium service. Start with stills, then add video as your skills and budget grow. Offer packages so clients can choose.
Software and Tools
You will need editing software, a place to store files, and a way to deliver them.
- Editing: Lightroom is popular for batch edits and presets. Photoshop helps with fine cleanup. Free options include Darktable and phone apps.
- HDR blending: Lightroom’s merge tool, Photomatix, or manual layers in Photoshop.
- Storage: An external drive plus cloud backup.
- Delivery: Online galleries or shared links that let clients download full-size and web-size files.
- Planning: A calendar app, a map app, and a sun-position app.
Pick one tool for each job and learn it well. Fewer tools mean faster work.
File Delivery and Organization
Name your files clearly, for example with the address and a number. Keep a folder for each property with RAW files, edits, and final exports. Export web-size images for listing sites, usually around 2,000 pixels on the long edge, and high-resolution files for print. Back up files in two places for at least a few months. Send the gallery link with a short, friendly note. Deliver the images in the order the agent will likely use them, starting with the best front view.
Seasonal and Weather Tips
Weather changes how a home looks, so adapt.
In summer, midday sun is strong, so shoot interiors when windows are not in direct sun. In winter, days are short, so plan your day around daylight. Spring and autumn offer pleasant light and colorful gardens. Rain can ruin exteriors, so reschedule when you can, or do the interior first and return outside later. In snow, clear the paths so the home looks welcoming. Gray skies are fine for interiors but dull for exteriors, so keep sky edits subtle and honest.
Working With Agents and Sellers
Good communication prevents problems. Before the shoot, confirm the address, time, access method, number of photos, and delivery date. Ask about must-have shots, such as a pool, a view, or a special feature.
Send a short prep list to the seller: clear counters, put away personal items, open blinds, mow the lawn, and move cars. Be polite and quick. Most sellers appreciate clear guidance.
On shoot day, introduce yourself, respect the home, and keep the space tidy. Wear shoe covers if asked. Do not move valuables without permission. If something looks wrong, such as clutter or a broken light, tell the agent early.
After the shoot, send a preview within a day if you can. Ask if they need anything adjusted. Reliable agents become repeat clients and refer others.
Getting Your First Real Estate Photography Clients
Start by photographing a few homes for free or for a small fee, such as those of friends or family. Build a simple portfolio and a basic website. Then reach out to local agents, brokers, and property managers.
Send a short, friendly message with a few sample images. Offer a trial shoot. Show how your real estate photography helps listings stand out. Deliver fast, since agents work on tight deadlines. A 24-hour turnaround is a strong selling point.
Follow up politely, and ask for reviews. Agents often refer photographers to colleagues, so every happy client can lead to more work.
Pricing Your Real Estate Photography
Prices vary by market, home size, and number of photos. Many photographers charge a flat fee per shoot, with add-ons for drones, twilight, or video. Research local rates before setting yours. Start fair, not too cheap, since low prices can signal low quality. Raise your rates as your skill and demand grow. Set clear terms for usage, delivery time, and cancellations. Clear pricing keeps real estate photography profitable.
Legal and Business Basics
Get permission before you shoot on any property. Respect privacy and avoid showing faces, documents, or license plates. Use a simple contract that covers fees, usage rights, and delivery. Check local rules for drones and for business registration. Keep records, track income, and save receipts.
Practice Ideas to Improve Fast
- Shoot one room in three kinds of light
- Photograph your own home weekly
- Recreate a listing photo you admire
- Edit the same image three ways and pick the most natural
- Ask an agent for honest feedback
Treat real estate photography for beginners as a skill you build step by step. Small, steady practice beats rare long sessions.
Frequently Asked Questions
What is real estate photography?
Real estate photography is the practice of photographing homes and properties for sale or rent. It focuses on bright, level, honest images that show space and condition.
How do I start real estate photography for beginners?
Learn your camera’s manual controls, practice in homes you can access, build a small portfolio, and offer trial shoots to local agents.
What gear do I need for real estate photography?
You need a camera with manual control, a wide lens between 16mm and 24mm, and a tripod. A remote and a level help too.
How much does real estate photography cost?
Real estate photography usually costs a flat fee per home, with extras for drones, twilight, or video. Prices vary by market and property size.
What time of day is best for shooting homes?
Bright, soft daylight is best, often mid-morning to early afternoon, depending on window direction. Twilight works well for exteriors.
Can I use my phone?
Yes. Use the grid, HDR, and a tripod, and edit gently.
How many photos should I take?
Plan 20 to 40 images for an average home, covering every main space.
Key Takeaways
- Light matters most. Use soft daylight and match bulbs.
- Keep the camera level and use a natural wide lens.
- Stage the home before you shoot.
- Edit honestly.
- Real estate photography rewards steady practice.
Conclusion
Real estate photography is a skill anyone can learn. Learn the gear, control the light, prep the space, and edit with care. Every shoot teaches you something new.
Start with the checklist on your next shoot. Build a small portfolio, reach out to local agents, and keep practicing. With time, your photos will help homes sell faster and your business will grow.